HOME     PROJECTS     STORIES     PHOTO WIZARD     ABOUT     WEBSITE
Showing posts with label Family History. Show all posts

Tuesday, November 15, 2011

It's a Small World!

Last night I spent some time on a project for a dear friend. We've been working on her parent's personal histories. It's been a work-in-progress...for a very long time. We are now pulling out the stops and pushing hard in hopes of having a book ready for Christmas. Recently my friend brought over 3 very large family albums with priceless memorabilia that needed preserving. As I was going through one of the books, I came across a picture that had a familiar looking name. The photograph snapped more than 60 years ago and lovingly kept all these years by close friends was my own husband's Uncle K and Aunt Ina.

Not only am I helping to tell my friend's story, but in the process, I found a small family story of my own!

Friday, November 4, 2011

Family History Subway Art

I've been dreaming about this project for months. Back in May, I bought a large piece of canvas (24x48") and painstakingly hand-painted 4 generations of family names onto the canvas. NEVER AGAIN!

In my typical hurried fashion to get the project done, I slathered on what I thought was a clear antiquing gel. Turns out that opaque crackle paste doesn't turn transparent over time.

Lesson LEARNED!

At first, I thought the sign was ruined. But the good news is that this little faux pas simply forced me to find an easier way to do this project!

My computer is my favorite art tool. I decided to create a poster-sized print and with the aid of my second favorite art medium, Mod Podge, get this project done.

First I created two different layouts for my 24x48" canvas. I really preferred the vertical design as it's more in keeping with Subway Art, but I have the perfect spot to hang the horizontal version so I went with design #2.

Here's a nifty cost-saving trick. Print your poster using only black ink. It'll save you you a TON of money!!

Once the poster is trimmed and checked, you're ready to glue!

Here's another helpful hint... Get a BIG bottle of Mod Podge glue. I used most of a 16oz bottle. Also, go for the matte variety. I think a glossy sheen would have made the end result look too modern.

I wish that I could say that the gluing step was easy, but alas, it was a major pain in the bum...and since I have 'mod-podged' 1000's of projects over the years I'd like to think I'm not a mod podge newbie. You'll wrestle with curling paper and bubbled paper. Don't give up! I spent the better part of a day trying to tame my bubbled beast, but I think the end result was worth the effort (and my kids definitely didn't mind frozen orange chicken for dinner!)

Once the glue is dry and bubbles popped (yes, I ended up popping a few bubbles), you want to beat up your lovely masterpiece. This step might be hard for the perfectionist. I happen to love that my slap-in-on, tear-it-up approach only makes the end result that much more authentic looking.

I distressed...


And sanded...

And painted touch ups.

Once everything was to my liking, I added layer after layer of Mod Podge glue, letting each layer dry and giving it another good sanding before slathering on another layer of glue.


Anyone who has taken a craft class from me knows that my mantra is 'Less is More' when using Mod Podge. This is one of the few times you want to ignore that advice!

Loving my new piece of family artwork!

Wednesday, March 23, 2011

Preparing Your History for Printing

About two weeks ago, we participated in the South Davis Family History Fair. We taught a class on 99 ways to share family stories. We invited our good friend and the-guy-in-the-know, Ted Tueller, to share his knowledge on printing books. Ted has been in the business for over thirty years. Not only does he have all the latest and greatest digital printing equipment, but he learned the trade back in the day when individual letters were laboriously set by hand.

Ted put together a handy synopsis of his presentation. He has given us permission to include it here for anyone looking for help printing their own family history.

Things to Consider When Preparing a Family History Book for Printing

Anyone familiar with computers can, in most cases, do all of the typesetting, setup and creation of their own family history book. These informative points can assist in helping you save time and money. You will be able to create a high quality book for publishing without having to incorporate the help of professionals in the preparation of the electronic file.

1. Get an idea of what style of book you want.
Books already printed by others can help in deciding what looks and reads the best. Look closely at the books previously printed by your printer and at bookstores. Generally in the bookstores, you will see many books prepared by professionals and they have ideas that look very nice. Other books done by individuals can also look good if they have been prepared using the guidelines that follow.

2. Decide what size the finished book will be.
Most Family History books are 8.5x11, but other sizes can be done as well. If a book is printed as a landscape book (such as an 8.5x11 book that is bound on the 8.5” edge rather than the 11” edge) this usually increases your overall cost of the book.

3. Decide on your margins.
Good margins (the distance from the edges of the book to the text) will help your book look good to the eye and makes it a joy to read. Large margins are common in books sold in bookstores. It is a good rule to have a minimum of one half inch margin, and larger will only enhance the look. Keep in mind that if the text on the page is centered left to right, after it has been bound it will not look centered as the binding changes the look of the page. It is best to keep the binding side of the text with somewhat of a larger margin for easier reading.

4. Page numbers.
Most books have several pages at the beginning that preface the content of the book, such as title pages, publication and legal information pages, acknowledgments and table of contents. These pages are sometimes numbered with roman numerals or are not numbered at all. Actual page numbers of the book will begin at the first chapter or where the main idea of the book starts. Odd pages should always start on the right side and even page numbers on the left. New chapters and beginnings of new sections should generally start on a right hand side. A blank left hand page now and then is common and is to be expected for consistency.

5. Decide on what type of binding you want.
There are many ways to bind your book. One of the most common is a hard cover with the pages sewn inside. Most books you see in a bookstore are done this way. If the book has 16 to 80 pages it can be saddle stitched like a magazine, but keep in mind that if you have too many pages in your book it may not lay open because of the bulk of the pages being inserted inside of each other (a 40 page saddle stitched book is the maximum for a great looking book done with this type of binding). Spiral or Wire-O binding is another option. These types will lay very flat when opened, but they do not have great shelf appeal. Perfect binding is encasing the pages inside a wrap around cover and gluing the edges to the cover, like a phone book or a paper back book. Perfect bound books are not very durable. You can also three hole punch your book to be inserted into a ring binder.

6. Choose your software.
Create and keystroke your book in a software that allows you to export a pdf of your file. Some software does this easier and better than others. Before you go too far with the keystroking of the book, it is always a good idea to take your first 20 or so pages to the printer that will produce the book and have them take a 'printers look' at what you have done. This is also a good time to get suggestions from them for any enhancements that could perhaps be implemented. Again, any software that can create a high resolution pdf will work.

7. Fonts and typesetting.
Choose fonts that are easy to read and try not to use too many different styles. Times and Times Roman are common, and most books are set using a serif font (see illustration). It is not necessary to have 2 spaces after a period in a sentence, if that were correct, someone would have created a keystroke that did that for you automatically.


8. Using photos and scanned images.
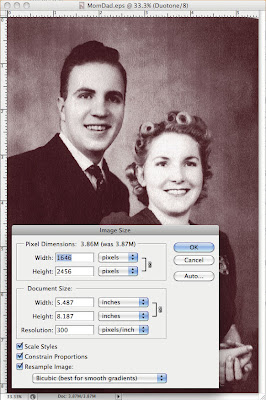
Photos and images are effective in helping the appeal of a book. It is important to scan these items properly for the best quality and size of your electronic file. If you are undecided as to printing a photo in color or black and white, it is best to place it in your document as a color photo as it is easy to print a color photo black and white where you cannot print a black and white photo in color. Scans and photos need to be at a high resolution, but it is common for people to scan them so high that they create files that are much larger than needed and this can cause printing, transfer and archiving problems. When scanning an item, examine the size of the original first and decide if it will be used at the same size, enlarged or reduced when placed in the book. If you scan all of your files at a high resolution you can reduce the size in Photoshop easily. Keep in mind that if you scan an 8x10 photo at high res and then import it into your book and only use it as 2x2.5 you will have a file that is much larger than it needs to be to print well. If you open a scanned photo in Photoshop and go to the “Image” pull down menu and go to “Image Size” you will be able to see how large your file is and reduce its size, if needed. When you open this “Image Size” window you will see the size and resolution of your photo. A resolution of 300 is the maximum resolution needed to produce the best quality, if your photo is being used at a one to one or smaller ratio in the book. Protect your original files, both the photo being scanned and the electronic file. Keep a file of original scans and make copies of any that you manipulate or reduce in size so that you can always go back to the original. Saving any altered files with a different name is always a good idea.Your files can be transported on a CD, jump drive or a portable hard drive. Your printer may also provide an FTP (File Transfer Protocol) site to upload your files to them.

Checklist for creating your family history book
o Choose a quality printing company experienced in book printing
o Choose style of book
o Decide on the book size
o Decide what margins to use
o Decide how your page numbers will be used
o Choose the best type of binding for your end use and budget
o Choose the best software for the project
o Decide on the fonts you will use
o Know how to prepare and maintain your scanned documents and photographs

Tueller’s Press, 530 West 1500 South, Suite M, Bountiful, utah 84010 • 801-677-1111 • tuellerspress.com

Sunday, March 13, 2011

Remember Me Bingo

Wow. Where does the time go? I can't believe it's nearly been a month since our last posting. It's not that we have nothing to talk about. We're just running too fast to share what we've been working on.

Last week we attended the South Davis Family History Fair. We enjoyed sharing our ideas for telling family stories and LOVED hearing all of your great ideas. One idea that we've just gotta try is the family calendar challenge:
Every year there's a family out there that creates a new and unique family calendar. One year they challenged extended family members to submit pictures of where (or what) they want to be 10 years from that date. Kids shared photos of career dreams. Adult shared visions of exotic trips. The family patriarch wanted to share his picture pushing daisy at the local cemetery. His wife overturned that idea! What a great way to share family pictures and preserve history and capture future dreams!

We were excited to share our newest project. It was received with lots and LOTS of positive comments.

Remember Me Bingo
We partnered with Lasting Impressions to create another Quick Mix to be used with Memory Mixer.

For six big ones...yep, that's right (Six bucks will buy you the Quick Mix to make 1 or 100 of these bingo games. (Remember, you need the Memory Mixer software in addition to this Quick Mix.)

It's as easy as dragging pictures on to the page and typing up a short story for each picture.

If you set up your pictures ahead of time you won't need to make any alterations.

The Quick Mix will even add a name (just follow the instructions that are included).


The project comes with 4 different background designs. Make 4 boards or 40 boards. It's a perfect project for an upcoming family reunion, school party or special birthday party.

You'll make one call-out card for every featured picture. Here are a few of my stories:


Remember, you won't find the software on our website. You've gotta go to Memory Mixer to check it out. Just be sure to come back and tell us what you think!

For those of you who came to the Bountiful event: If you want the same professional print job as our sample set, send your final file to Tueller's Press. You know we can't say enough good things about Tueller's Press!

Tuesday, October 12, 2010

October Challenge: Create a Treasured Heirloom

Look at that. We're already falling behind on our own challenge. Isn't it interesting how life gets in the way of the best plans? We really have made progress... we just haven't had two minutes to share our tiny little baby steps with you.

I had planned to gain control of my kids stack of VIPs (Very Important Papers). Once again, I've let the pile get out of hand, but I'm confident that I can knock it down to size in a matter of an hour (or two)! I'll share my easy, no fuss approach in the coming week. (Yah, right! Ok, so it's a worthy goal.)

Suni and I got to catch up this past weekend as we shared our passion for preserving stories with two different groups of ladies. In between helping our class participants create their own work's of art, Suni reported that she has had success with her personal efforts of COLLECTING and PROTECTING. She plans to share her strategies in the coming days (er, or weeks... another reality check!).

While I didn't quite make Week One's focus of COLLECTING and PROTECTING, I did make a solid home run with Week Two's endeavor.

This week's focus is to CREATE some sort of treasured heirloom. I wanted to preserve Suni's beautiful memories of welcoming baby #3 into this world. Because I was lucky to be the one holding the camera, I had easy access to all sorts of fabulous memories. I just knew that these pictures needed to be turned into block ornaments!

I just couldn't share the project with you until I gave Suni (and baby) a chance to check it out.


This project took about two hours from start to finish. All I needed was six blocks, 6 metal eye screws, some decorative paper and ribbon, a jewelry stand and 24 fantastic pictures! Go here to get the complete set of instructions for making these easy Block Ornaments. A rather boring, but very detailed video is available here. The jewelry stand was picked up at a local store called Rod Works for under $10.00. If you have an old mug tree from the 70's, it'll work equally well!

The best part is that I didn't have to pick ONE favorite picture to feature. I got to share 24 fabulous memories!

Here are some additional ideas of things that you can create that are sure to become a treasured heirloom:

1. Make a pictorial Family Tree.
2. Create a family heritage recipe book.
3. Work with extended friends and family members to collect personal memories of an individual to share with that person as a gift.
4. Display a digital picture frame that includes pictures of your extended family.
5. Create a family calendar. Record family members (current and ancestors) birthdays throughout the year.
6. Start a family blog or web page featuring your family stories. Be sure to print copies of stories for a book version.
7. Collect family history questions in a jar for a grandparent to answer about their life history.
8. Start making Block Ornaments so you can turn your Christmas tree into a Family Tree this holiday season. (A personal favorite!)
9. Create a world map showing the birthplace of each ancestor using pins or tiny flags.
10. Poll family members as to their favorite family tradition and create a book documenting these memories.

Next week, we'll look for ways to DOCUMENT and RESEARCH our family history.

Friday, October 1, 2010

October Challenge: Collect / Protect


In honor of October's Family History Month both Suni and I are taking the Stories by Me Challenge. This first week will focus our efforts on Collecting / Protecting Memorabilia.

We hope that you'll take the challenge. We've created a list of ten different ideas to get the creative juices flowing. Pick one, or come up with your own. Let us know your successes. We can also learn from your failures...so don't be shy. Send us an email (send it to mythoughts@storiesbyme.com) or add a comment to our blog. At the end of the week (Oct 9th) we will pick one winner who can select $40.00 worth of Stories by Me products. That's right. Forty buckaroo's towards anything project calling you. (And we'll pay the shipping too!)

WEEK ONE: Collect / Protect
1. Locate your pictures.
2. Label your pictures using an archival quality pen.
3. Organize your immediate family documents and important papers.
4. Scan original documents (certificates, wills, journals, letters, etc.), label and store them in a safe place. Share files with family members.
5. Collect copies of documents for as many ancestors as possible.
6. Take pictures and record memories of family heirlooms.
7. Frame keepsakes or mementos in a shadowbox.
8. Protect any handmade items made by an ancestor.
9. Go through old Books of Remembrances or photo albums and preserve them with acid-free materials.
10. Convert an old family movie to DVD format.

Let Carrie inspire you at Or So She Says... LOVED her idea on capturing family history!

Be sure to check back during the week. Suni and I will update you on our progress. We'd also LOVE to share your stories!

Oh, if life isn't already busy enough... We'll be at Deseret Book's Ft. Union Ladies Night on Saturday, Oct 2. Can't wait to share some of our new projects and pick up a gift or two... it's a perfect time since everything is ON SALE!

And, if I haven't already mentioned... Suni had the absolute MOST beautiful baby a few weeks ago. Is it possible that his one month birthday is creeping up? There is NOTHING better in this world than holding a sweet baby (crying one's just don't have the same charm) in your arms and breathing in all of their goodness. It makes the craziest day seem almost sane. Thanks for keeping me sane Baby B!

Yes...that is Suni already fitting in her skinny jeans. That is sooooo NOT FAIR!!

Monday, September 27, 2010

October is Family History Month

Did you know that October is officially designated as "Family History Month" in the United States? S.RES.175 passed back in July of 2003. This was a big deal to genealogists. It was also meaningful to the more than 80 million American's that are said to be actively searching for information about their ancestors. Even if you're not so interested in the distant past, someday, you'll be an ancestor to some future generation. Wouldn't it be nice to have your story told the way YOU WANT to be remembered?

If you are at all familiar with the mission of Stories by Me, you know our passion for preserving life's many stories. It didn't take us long to figure out that not all stories are preserved in book format. There are as many ways to preserve a memory as there are stories to tell.

Just like most of you, we're running hard to keep up. There is never enough time to get it all done. One thing that we've learned along life's journey, though, is that zero times any number will ALWAYS be zero. So, if I make zero effort to preserve my life stories for the next 12 months, I will have nothing to account for those 12 months. But, if I'm able to squeeze one meaningful task out a month, at the end of the year, I will have 12 beautifully preserved memories that will be enjoyed for generations to come.

The list of meaningful projects are ENDLESS!

We've decided to lump these projects into four different categories:
COLLECT / PROTECT
CREATE
DOCUMENT/ RESEARCH
CONNECT with FAMILY

For the next four weeks, Suni and I are committing to focus a personal effort in each category. At the beginning of the week, I'll share a list of possible projects and then during the week we will both report on our success (or failure) at our efforts. We will keep it real! Suni just had a baby and since my baby is nearly 14, I recently returned to the work force, so some days it's all we can do to keep our heads above water!

We would LOVE for you to take the Stories by Me challenge. Maybe all you can do is ONE Family History project during the month. Guess what? You've got ONE thing DONE! We'll even sweeten the deal by offering a giveaway each week to everyone who shares a story or comments!

We'd love to hear what you're doing. Send us your story at mythoughts@storiesbyme.com or add a comment with a link to your blog.