HOME     PROJECTS     STORIES     PHOTO WIZARD     ABOUT     WEBSITE
Showing posts with label memory calendar. Show all posts

Thursday, August 25, 2011

Losing Count and Sleep!

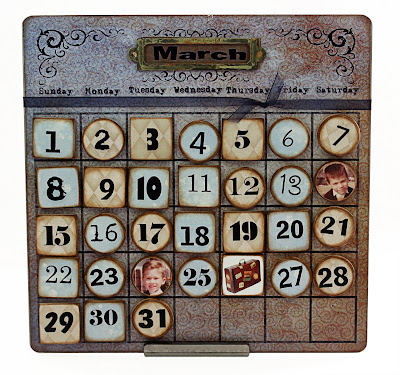
I'm already slipping on my resolve to share all of our new projects for Swiss Days, but here's our latest calendar design. There's a funny story that accompanies it. Suni was making up a few sets for the non-do-it-yourselfer. About an hour into the project I got a phone call. "Did you mean to leave off the #12?" What? In my haste to get the file to the printers, I somehow deleted an entire day from our perpetual calendar. Now, anyone who knows me, knows that if given the chance, I'd ADD days to my month, not take one away! Grateful, it was an easy fix. Our printer is used to my 'fly-by-the-seat-of-my-pants' and has already provide the errant #12.

Friday, August 13, 2010

Overstock.com

We are excited to announce that two of our Stories by Me products are now being offered through Main Street Revolution, a partnership between Overstock.com and small businesses throughout the USA.

Overstock.com is known for their good deals and they made sure that their Main Street pricing is as good as you'll see anywhere. What really makes this deal sweet is that shipping only adds a couple bucks to the order. Our products are quite hefty, making them expensive to ship. Right now Overstock is having a special deal and shipping is only $1.00. PER ORDER!

We're still trying to figure out how to be 'seen' at overstock.com. We spent nearly 30 minutes before we found our products tucked away under the category Scrapbooking Kits. We tried to get them to create a new category...something like Heirloom Products or Memory Preservation, but they're still chewing on that request.

For the time being, we'll provide a direct link here:
Memory Calendars Kits
Memory Tree Kits

We'd be oh, so grateful if you'd check them out. If you've tried our products, give them a review. Share what you're doing to tell your family stories. We'll continue to try to get our products more visible and easier to purchase!

Saturday, January 9, 2010

How to display a SbM Magnet Board

We've had several requests for a review on ways to display our magnet boards. These different options work equally well with our 8x8 or 12x12 boards.

1. Easel
Probably the easiest and fastest way to get the project out and in front of your face. If you're using the easel with a Memory Tree, look for something that won't collapse while your kids are playing with the set. We offer our own version...which beautifully displays either board size.2. Ribbon
Not much to this option. The holes have been predrilled, you just need to push through the paper design. We recommend holding the board up to a light and pushing from the front to back of board. Use a thumbtack...a toothpick...a paperclip...or whatever is handy! The holes are purposely small. If you're considering thick, chunky ribbon, you might want also use a couple of metal book rings.
3. Magnets
Here's a great option for displaying your project on a filing cabinet, refrigerator front or other metal object. Just make sure to use several super-strong magnets on the back of your board.
4. Frames
We LOVE the customized look that these unfinished frames give to our different projects. We purposely sized our metal boards small enough to fit into most standard frames. Click on the links to learn how to make your own.

Collage Frame Instructions:
Fabric Frame Instructions:
There are our ideas. Hope it inspires you. Be sure to share your own creations!

Wednesday, April 15, 2009

Photo Wizard Update

Want to feature family members on your own Memory Calendar? We're happy to announce that our Photo Wizard is ready to help!

First you'll need to locate and digitized pictures of friends and family that you want to remember on your calendar.

Next, go to www.storiesbyme.com and click on the Photo Wizard menu option. Look for the Get Started button. Enter your account information, or set up a new account. Don't worry...it's free!

The next screen is the Add Photos page. Just like the name implies, this is where you'll add pictures to your account. Simply click on the Browse button, find the picture files on your computer and press the Add Photo button. You can add up to 20 pictures, so don't forget anyone!

Once your photos are loaded, select the project that you're working on...in this case, Face Buttons. All that's left is to format the picture within the dotted lines. Use the slider bar to shrink or enlarge your picture. Your Memory Calendar Kit comes with round and square shaped buttons. Be sure to use both shapes when formatting the pictures.

Here's the part (the IMPORTANT part) that tells the Wizard what size to make these pictures so they'll fit the calendar buttons. BE SURE to select the project type. You'll need to do this once for each picture. It's easy, just click on the arrow to the right of Tree and highlight the Calendar option.


Save your changes and click on the Add Photo to Print list. Once you've added all of your pictures to the print list, you can click on the Print button located in the bottom right corner of the screen. The Wizard sends you an email with information on how to access your print job and important printing details.

You are now ready to create a keepsake that is sure to bring a smile to your face as you remember those things most important to you throughout the year.

Friday, February 27, 2009

Memory Calendars

Just released! Our newest product is making its grand debut at the St. George Family History Expo. It's a calendar that you can use year after year! Feature family faces on important dates and you've got a treasured keepsake that is uniquely yours.

So, whaddaya think? We might be a little biased, but we think they're fabulous and have had a blast testing the process by making a few. Hope my sis doesn't see this blog before she gets her birthday gift! Check out how easy it is to format your pictures for the buttons by using our exclusive Photo Wizard. We're still waiting for our programmer to add this project's dimensions to our software, but we figured out an easy workaround by using the Face Button for the Memory Tree option. Just alter the scaling ratio to 70% for round buttons and 80% for the square shape. We know, the instructions implicitly state that you're supposed to print at 100%. Contact us if you need more information!


Our featured calendars are displayed using a metal easel, but they look equally wonderful hanging on the wall. Just punch through the paper (holes have been pre-drilled) and complete with a ribbon. They also look great in a frame. Try finishing one with chalkboard paint so you can add messages, when needed. Suni's mom came up with her own perfect way to display these calendars. Just apply four super-strong magnets to the back of the board and attach it to any metal surface, like a refrigerator or filing cabinet. Wow! Such versatility!!


We have had so much fun putting this project together. We even have holiday buttons so you can highlight those memory-making moments throughout the year!

Our Memory Calendars are now listed in our Etsy store. We're also working to get them on the website, but that's not going to happen until late March. Our programmer is booked until the end of the month and he's banned me from touching the code since I know just enough to break things!


We'd really like to know what you think!

Sunday, February 22, 2009

We've been busy!


We couldn't wait to show you what's been keeping us so quiet on the blog front... and housework front and time with friends front...

Some of the products are new and improved, some are brand-spanking new; all will be available on our website and/or Etsy store.

Let us introduce you:
Memory Puzzle Blocks - These are what got us started. And what a great start!! We'll be eternally grateful to My Mind's Eye for giving us a hand-up and helping us bring in our first boatload of puzzle kits. We've now sold more than 10k of these wonderful little kits that preserve memories in the uniquest of ways. This year we hope to introduce a Stories by Me kit version. We think you'll like (scratch that...LOVE) our new and improved Memory Puzzle Block kit!

Memory Trees - These big guys were unveiled last summer and much to our delight were an instant hit! We're thrilled that you have embraced them and made them such a popular gift item. Yes, we know that the hard part is finding pictures of all the loved ones that need to be featured in your family tree. But it is SO worth the effort! Remember that while our tree's were made to display 3 or 4 generations, you can keep making face buttons and add them to your family button box. That way no one gets left off of the family tree!

Our designer, Carol, has done us proud!! We are drueling over our new Antique Floral design and the Cream Leaf pattern goes with EVERYTHING!

Vintage Tins - These beauties were created in conjunction with our Memory Trees. We had all these fabulous vintage photographs that were begging for a more prominent spot than what the archives could offer. They have been a huge hits at our shows and our collection keeps growing, thanks to your many suggestions. Only problem is that we haven't figured out how to make them available on our website since the collection is constantly changing. We're working on adding a core collection to the website and will put other pieces on Etsy, as time allows.

Memory Calendars - We are so excited about our new Memory Calendars. We've been kickin' around the idea for nearly a year and then BAM! it just all came together beautifully. The calendar will be sold in kit form (like the Memory Trees) and offer just what you need to make your own memorable calendar. What makes these so cool is that you'll be able to customize your calendar by featuring family faces on special dates. We know... we just had to include family pictures in the project! Yeah, the picture is so tiny, it doesn't do justice to the finished project, but more pictures are coming. And, Suni is working to get this into our Etsy store.