HOME     PROJECTS     STORIES     PHOTO WIZARD     ABOUT     WEBSITE
Showing posts with label photo wizard. Show all posts

Saturday, December 4, 2010

Help, My Prints have Expired!!

How is this possible?

If you're getting the message, "This Printout has expired" and you've just finished processing the pictures, our bet is that you've pressed the print button in the Stories by Me Photo Wizard more than once.

You should have seen a dialog box like this one pop up:


Remember, you can only have one active print job in your account at a time. (This is how we can offer this service for FREE!) We don't store your pictures. We only let you have one active print job at a time to ENCOURAGE you to save the .PDF to YOUR COMPUTER.

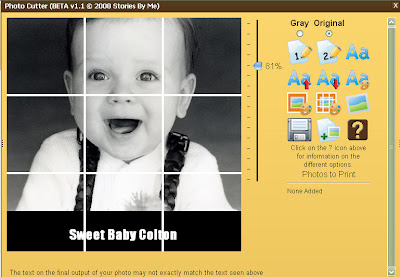
Have no fear, your pictures are still in the Photo Wizard, formatted just the way you saved them. You just need to go back into your project and add them to the print list.

Next time you create a print file, OPEN the email that the Photo Wizard sent you, CLICK the link and SAVE the file to your computer. That way you have it ready to print one...or one hundred copies!

Same goes if you're sending the file to your local print shop for printing. You can't just forward the email that our Photo Wizard sends you...it's password protected so only you can view the pictures. Send them the SAVED file as an attachment.

We've posted more helpful hints to using the Photo Wizard here.

It really is easy... and worth the extra steps to format your pictures for these projects.

Think of ALL the stories you have to tell!

This one ornament print sheet contains enough pictures to make 5 ornaments!

Friday, November 12, 2010

Why Does it Do That?

If you have tried to format your pictures using our Photo Wizard, you might have noticed a slight variation between what you see on your screen and the final print that our Photo Wizard sends you.

Here's the screen version. Formatting pictures for the puzzle can be tricky because you are trying to keep the 4 lines (nine sections) from dissecting important parts of the picture. I scaled the picture to 153% to fill the frame to my liking. The position of the faces look OK too. Notice how the right line falls to the left of the boy's eye and near the bottom of his chin?

The above image shows the picture as it comes back from the Photo Wizard. WHAT? The line now runs down the center of the boy's nose and near the bottom of his lip. That's no big deal, but one of the other lines (the line that you CUT!) now runs through the mom's eye. That is a much bigger deal (partially because it's MY EYE!) Seriously, we've helped more than a thousand of you create these works of art. It's no big deal to cut through an ear, forehead or cheek, but cutting through someone's eye is somewhat disturbing as it distorts the entire face.

Our programmer tells us that this is due to the fact that we are viewing the image on our screen, but the software formatting the picture actually resides on a server several states away. Because of the myriad of computer monitors, not to mention all the varieties of possible settings, our software has to make some assumptions as to what you are seeing.

Knowing that the Photo Wizard sees things slightly to the left and down from what I'm seeing, I simple pushed the picture up a little and to the right of where I wanted the final line to reside.

I now have the perfect layout for the puzzle project. This cute picture was from a family photo shoot a couple of years ago. I'm actually whispering into the ear of my son during the session, telling him to knock off whatever shenanigan he was up to. The photographer captured the moment and it's ONE of my favorite pictures!

Other projects are much easier to layout. Here's the ornament project...

Notice that a smidgen of the ear is missing. Not a big deal as I know that I'll be sanding that edge and distressing it with ink as I finish the ornament. If I wanted to, I could apply the same process of pushing the picture slightly to the right to get the entire ear in the window.

Keep in mind that you can only have ONE active print job in your account at a time. If you decide to reformat your pictures and repress the Print button, you'll get the following message:

If you think you MIGHT want to use that previous layout, save a copy of the file to YOUR COMPUTER. (Saving a copy of the email doesn't help, it only provides the link to your file!)

Now you know!

Monday, November 2, 2009

Website Update

Tomorrow is a big day for us! It's the day that we share what's been keeping us so busy. We're excited to have you check out our new and improved website. The look and feel of the website hasn't changed, but take a look around and see if you can spot the changes.

Here's a couple of the new gadgets...

1. You can now use the Photo Wizard to prepare your pictures for the ornament and letter block projects! Yah, we know, it's about time. Thanks to our Swiss Day customers who have been patiently waiting. We think you'll love how easy it is to format your pictures for the different projects. We sure LOVE that we can now print 20 ornament pictures on a page! No more fiddling with the scaling or only getting one block ornament printout per page.


2. Had pictures that were too big to load into the Photo Wizard? Notice the past tense?? You're going to love how much easier it is to upload your pictures. We still have size limitations based on the whole internet thing, but now if you try to ADD a big picture, the Photo Wizard is going to give you the option of using our new Java Uploader feature.


3. We've also updated our Demo's and Tutorials section! Keep in mind that this is a work in progress, but it's the place to go if you have questions about any of our projects!

It seems like there is always something needing cleaning, changing or explaining, in life and in the virtual world of the internet. We'll continue to chase down the dust bunnies and get everything in working order, just in time for the next set of changes. Remember, tomorrow is the big day! Come check out the bells and whistles, kick the tires, look under the hood and let us know what works...and doesn't work.

Friday, July 17, 2009

Picnik Fun

That is not a misspelling. It's Picni-k, as in Picnik Photo Editing. Need an easy way to edit your photographs and Adobe Photoshop isn't handy, or maybe Photoshop just makes you feel less than handy? Check out how simple it is to get your pictures ready for sharing --whether you have a few simple cropping needs or want to jazz up your photograph with an multitude of fun options.


This is an amazing picture of Kevin's great-great Grandfather, Christian. It's amazing because five short years ago we knew almost nothing about this man. We had one photograph and a few scant pages of history on a remarkable individual who made some tremendous sacrifices of which we are the beneficiaries.

We've learned a lot in five years. We've also discovered the previously mentioned photograph at an extended family reunion two years ago. (See why I LOVE family gatherings?!) Several records were left of Christian's life experiences, most penned through children's recollections of their father's stories. Christian's history provided two short sentences of his 1000 mile trek across the plains. "In the spring of '49, I left my father's family in La Selle, Illinois and came to Salt Lake City. We were seven wagons in company... arriving in SLC October 25, 1849."

That's it! Could that be all that happened?I think not! It took some sleuthing, but gratefully, one Canute Peterson left a more detailed record of his adventures on the trail. He thoughtfully included the names of several in his company, including our ancestor, Christian!

"On the 18th of April 1849, a company of 22 Saints left La Salle, Illinois to come to Utah. There were several young people in the company, among whom I may mention Sister Sarah Ann Nelson, Christ[ian] Hayer [Hyer] and myself. We had six wagons in our company.

A journey of about 200 miles brought us to Burlington, Iowa. We found the city deserted with the exception of the ferrymen and a few guards who were left to watch the city. The streets and porches had been strewn with new lime, because of the great Cholera epidemic."

This small group of pioneers joined the Benson Company in Kanesville, which was the last group to start for Utah that season. They traveled in "good peace along the Platte River and had a prosperous journey for many weeks. There was an abundance of game, such as buffaloes, antelopes, elk, etc."

When their camp was within eight miles of the last crossing of the Sweetwater, at a place called Willow Creek they were blocked by a tremendous snow storm that lasted 40 hours. Canute, Christian, and several others were asked to leave the relative comforts of their small wagons to search for missing cattle that had wandered off during the storm. They started on foot and found it a tedious journey due to snow that was waist deep. Luckily, the cattle had the good sense to hunker down in a grove a willow trees that served both as food and shelter from the harsh storm. Ten miles down the trail the snow vanished and the company returned to dry ground. Good luck prevailed and they reached the Salt Lake Valley October 25, 1849.

Bless you Canute for taking the time to write in your journal!

That's Kevin's great-grandfather, sitting to the left of his great-great grandfather and grandmother!

Wednesday, April 15, 2009

Photo Wizard Update

Want to feature family members on your own Memory Calendar? We're happy to announce that our Photo Wizard is ready to help!

First you'll need to locate and digitized pictures of friends and family that you want to remember on your calendar.

Next, go to www.storiesbyme.com and click on the Photo Wizard menu option. Look for the Get Started button. Enter your account information, or set up a new account. Don't worry...it's free!

The next screen is the Add Photos page. Just like the name implies, this is where you'll add pictures to your account. Simply click on the Browse button, find the picture files on your computer and press the Add Photo button. You can add up to 20 pictures, so don't forget anyone!

Once your photos are loaded, select the project that you're working on...in this case, Face Buttons. All that's left is to format the picture within the dotted lines. Use the slider bar to shrink or enlarge your picture. Your Memory Calendar Kit comes with round and square shaped buttons. Be sure to use both shapes when formatting the pictures.

Here's the part (the IMPORTANT part) that tells the Wizard what size to make these pictures so they'll fit the calendar buttons. BE SURE to select the project type. You'll need to do this once for each picture. It's easy, just click on the arrow to the right of Tree and highlight the Calendar option.


Save your changes and click on the Add Photo to Print list. Once you've added all of your pictures to the print list, you can click on the Print button located in the bottom right corner of the screen. The Wizard sends you an email with information on how to access your print job and important printing details.

You are now ready to create a keepsake that is sure to bring a smile to your face as you remember those things most important to you throughout the year.

Tuesday, December 16, 2008

Gift Tags for Remembering

Are you looking for fun ways to fill your holiday with memories? Dig out your old holiday photographs and use them to create special one-of-a-kind gift tags that will have everyone tripping down memory lane!
  • Find old holiday pictures. These pictures need to be in digital format, so if they aren't already electronic, get 'em scanned. If you don't have a personal scanner, check your local print shop. They can make this part easy!

    Be sure to save these pictures in a web-friendly format such as .JPEG, .PNG or .GIF.

  • Load your pictures into the photo wizard. Because we are on a shared server, we limit the size of the files that you can upload. The web link includes information on how to reduce file size, if it's needed. We are madly working on a new option that will automatically do this for you. Because we don't want to trip anyone up before the holidays, we won't unveil this feature until after the new year. If you need help, just contact us. We can help you get your pictures loaded into the software.

  • Format pictures. You're on the home stretch. All that's left is fitting the pictures to the window and adding text. This is a perfect way to document the person or date of each memory. Remember that the final picture size is less than two inches, so if you add text, it'll be even smaller. Keep the wording simple and GO BIG!

  • Save changes, add to print list and print the project. You own the .pdf file that you've just created, so be sure to save a copy to your computer. We don't save the file, so we can't help you once the file is deleted. This project will create 10 gift cards (2 per picture). Once you've printed the file (using card stock) cut along indicated lines, fold in half and voila, you have a gift tag. You can punch a hole and add a ribbon if you want a hanging tag.
In an effort to limit pre-holiday gift comparisons, we have been known to disguise the wrapped present using elaborate code names or numbering systems. Sometimes it's so complicated that we have to open the gift to see who gets it!

Last year I featured family photographs on our gift tags. It was fun to hear all the comments as they remembered certain events or asked for more details on events not remembered. No one figured out it was my way of coding the gift! We designed these tags as a SIMPLE way to preserve holiday memories. Feel free to jazz them up with decorative paper, glitter or stickers.

Oh, did we mention that this project is free? The only cost is the price to print the sheet. Be sure to use card stock for sturdy tags!

Thursday, November 6, 2008

Why didn't we think of that?

We recently received an email from a customer who said:

"I found a way to combine two photos on one puzzle side. You have probably been there and done that, but just in case you have anyone who needs help with that random problem, I figured a way out that has worked for me!"
We are always 'PhotoShopping' someone in (0r out) of one of our projects. Of course, we were curious to learn a different technique.

Well, Emily taught us a fabulous new trick! [This works best using pictures with similiar backgrounds. These beautiful pictures are my husband's grandparents.]

Hopefully, you've already digitized your pictures. Load them into the Photo Wizard. Select the puzzle project and pick the picture that will serve as the background. I didn't want to lose any detail of Grandma Hyer's beautiful dress, so she'll be placed in front of Grandpa. Try to position the background picture so that it fills two of the three rows. This can be a bit tricky, but I kept adjusting the picture size and location until it was just right. I scaled Grandma's picture to match Grandpa and then place her over the third row.


Save the pictures and add their files to the print list. Press the Print button located on the Wizard page and print the .PDF file that is sent to you.


Since we are using Grandpa's picture as the background, I cut his squares out first. I ignored the row on the far right since Grandma's picture will go there.


Follow the kit instructions for gluing the picture squares to each block.


Next, I cut out the section that featured Grandma. Be sure to include the parts that will 'overlay' on the middle row of blocks. It was easy to follow the cream outline of the dress, but Grandma's dark hair blended into the background color and I had to 'guess' on her hair style.

All that's left is to glue these pieces to the blocks. Once you add pictures to the other sides of the puzzle, you can sand, distress and protect the project with a coat of acrylic spray.

What a ingenius way to add faces. Thanks for sharing, Emily!

Friday, October 17, 2008

Hotmail Headaches

To our Hotmail customers:

Please be advised that Hotmail seems to be bouncing all of our emails. If you are using our Photo Wizard, you might want to use a non MSN email account. We can access your photo file, but need an accessible address to send to.

If you have any suggestions on how to fix this, we will be very grateful!

Monday, August 18, 2008

Preserving Pictures 101

I have a confession. I am not a scrapbooker. Oh, I love the beautiful memory books that my friends and family members have put together, but I actually feel a bit of anxiety whenever I go into a scrapbook store and see the mountain of available options.

It wasn't that long ago that I would have been hard pressed to get my hands on a baby picture of one of my children. It wasn't that we didn't have a million cute photos of the kids in every possible baby phase. I just hadn't gotten around to organizing the boxes and boxes that grew from my feeble attempts to stay on top of the pile.

I didn't feel in control of our photo madness until I started digitizing our pictures. What a difference it has made. I am now prepared for any family reunion, heritage project or school report that comes up; even those eleventh hour panic requests.

Here's some simple steps to preparing your pictures so that future generations can enjoy them. Everyone is at different stages. If you've already done step one, move to the next step. Remember to take baby steps! Some of these tasks will seem daunting, but it will also be an enjoyable trip down memory lane and your efforts will be appreciated for years to come.
Step One: Organize your pictures. Get a photo box (or a shoe box works) and organize your pictures in a way that makes the most sense to you. You might want to chronologically organize your pictures by date or event. I made a separate box for each member of the family. When I filled a box, I simply created a new box. The photo boxes usually come with simple dividers, or you can make some using 3"x5" cards. A box holds a LOT of photos! Breaking them into smaller, manageable sections using the dividers will make it easier to find a photograph when you need it.

Pictures already organized? Lucky you! Have you checked with your parents or grandparents to see what treasures they might have that need preserving?
Step Two: Document your pictures. I can't tell you how many family pictures I have inherited that we haven't a clue who's in them. It doesn't take long for the memory to blur. I didn't think I would ever forget the precious baby moments of each of our boys and yet, pile on a decade of additional memories and those sweet little faces start to look alike. What I wouldn't give to have some sort of clue to help me put names to the unknown family faces on the pictures I inherited. Use an archival pen to document your pictures and you'll guarantee that future generations will have no problem knowing their heritage. To avoid guesswork, include the day, month and year of each picture (if you can). Give the full name of individuals featured in the picture. Try to document the location of the photograph.

Step 3: Digitize your collection. I can't tell you what a great investment a personal scanner is. Prices have dropped immensely, and you can pick up a solid unit for about $100. Of course, you'll need a personal computer with sufficient storage for high-quality digital files. A CD burner will let you create a backup disk, as well as easily save copies for family members. External hard drives are another great way to back up your picture collection. I actually have two external hard drives. I pack one up and send it to a neighbors when we go on vacation just as an added measure to protect these valuable images.

Once all of the photographs have been scanned and saved, organize them into appropriately labeled folders on your computer. Our system is based on surnames and dates. Set up something that works for you. Consider uploading some of your family favorites to a photo hosting website such as Flickr, Photobucket, Image Shack so they can easily be shared with friends and family members.

Important Note: Digitized images are not considered a replacement for originals! Data (i.e. your image files) can be lost when the storage media deteriorates. Who hasn't had their hard drive crash? Software and hardware technology is constantly changing. Remember floppy disks? I have no way of reading them now. PROTECT YOUR ORIGINAL PHOTOGRAPHS! Store them in an acid-free environment,

Still going strong? Don't forget important documents and material possesions. Look for postcards and letters. Include programs, diplomas and certificates. Now is a great time to round up each family members' birth certificate, christening or baptismal records, marriage certificates, etc. for permanent protection. Grab your camera and snap pictures of Grandpa's coalminers lantern or Grandma's hat pins. While only one person can enjoy the original item, everyone can appreciate the memory.

Should I remove my photographs from old albums?

How to protect your original family photographs

Protecting family documents


Tuesday, July 22, 2008

Reducing Picture Size


Have you come across this message using our Photo Wizard? Currently, our software works best with photo files that are smaller than 500 KB. You can load a larger file, but if you try to load anything over 900 KB you'll probably get this message. Our programmer tells us this road block has to do with internet connections and server size. Be assured that we are working on it! We want our Photo Wizard to be 100% user friendly. Here are some helpful hints that will let you resize your picture files so they will easily load into the Photo Wizard. If you get stuck, drop us a note at wizard@storiesbyme.com. You can even email your photos to us and we will resize them for your project.

The first step is to go to our Photo Wizard. Visit storiesbyme.com and look for the Photo Wizard (center of the menu bar). Click on it to bring up the Photo Wizard page. Be sure to read Step 1 Gather Pictures. Some photos just format easier than others for these projects and we want you to be pleased with the end results!


So, how do you know if your pictures fit the size requirements? You can try to load them into the Photo Wizard and see if you get the message. You can also open your directory and check the file size. Most programs will display a pop-up window with file data if you place your cursor over the file name. At 1.68 MB, this picture file is too big for the Photo Wizard.

We'll discuss two easy options for reducing picture size. If you have Photo Shop, Elements or another photo editing software, read option one. If you're not sure what is available on your computer, option two uses a free on-line photo editing utiliity.

Option1: Photo Editing Software
Open your picture in the editing software. Look for the command "Image Size," "Resize," or
"Resample."

This picture's digital file was created using a scanner and was scanned at 400 dpi (dots per inch). At its current resolution, I could easily print a large copy and be happy with the resulting image. Stories by Me products do not require high resolution images for great results! A memory candle picture is smaller than four inches and our memory block puzzle measures about a six inch square. The current size of the picture measures about 6.4 by 4.6 inches. We could reduce the measurement, but if we just tweak the resolution (dpi) we should have a file that can easily be passed back and forth across the internet. For this example, we changed the resolution from 400 dpi to 200. BE CAREFUL to save your changes using the SAVE AS file option! Otherwise, you will write over your original file and lose the high resolution data. We usually scan important pictures in TIFF format. We then scan (or convert) a second copy as a JPEG (a much more manageable file size and internet friendly). The original gets stored in a secure location. We won't touch it again unless we need to make a new copy of it. By making this one change, we were able to reduce a 1.68 MB file down to 296 KB.

Option2: On-line Photo Editing
To use the easy three step, on-line option, go to www.resize2mail.com. Use the browse option to find the picture that needs resizing. Our software will let you crop your picture so use the third option listed in step 2. We typically use 50% reduction unless we have a REALLY big file. You can also rotate your picture if it happens to be on its side. Press the OK button and let the software do its thing. Be patient! Depending on the size of your file, your internet connection and traffic on the world-wide web, it might a minute or two.
Confirm that the final file size falls into an acceptable range (we recommend something that is at least 100 KB, but not over 800 KB.) Be sure to use the SAVE AS option (see Option 1 above) when you save your new picture file.

Now you are ready to load your picture file into our Photo Wizard. Wait until you see how easy it is to format your pictures for the Stories by Me projects! Be sure to check back. We'll give you other helpful hints for using the software and let you know about new features that are coming!

Sunday, July 20, 2008

Inquiring Minds on Photo Scans

I received a phone call from a friend with a question about photo preservation. She has several thumbnail-sized pictures of ancestors. In some cases, it is the only picture that they have of the individual and she wants to make sure that they preserve these images in the best way possible. All of us can relate. Who doesn't have teeny-tiny pictures in our collection of family faces? Some of our photographs have been cut into oval shapes and dutifully pasted into genealogy records by those doing the best they could with the technology of their day.

So, given the wonderful technology of the 21st century, what is the best method for digitally preserving these pictures? We usually recommend scanning pictures at 300 dpi. This will create a file that is more than adequate for regular viewing and in most cases will let you enlarge the picture without sacrificing resolution. We know that the .tiff format offers a higher quality image as it is uncompressed, but it comes at the price of big (sometimes enormous) file size! Here is Brenda's question in a nutshell: Is it better to scan these little pictures at a high resolution, say 600 or even 1200 dpi, and save them in .jpg format, or will scanning them at a lower resolution in .tif format improve their resolution?

We did a quick experiment on Great-grandma Ellen. Thanks for helping, Grandma! This picture only measures .75 inches x 1.0 inch. To add to the dilemma, the image happens to be a copy of a long-lost original. We scanned the picture at 300 and 600 dpi (dots per inch) in both jpg and tiff formats. The file sizes ranged from 59 KB to just over 1MB.

300 dpi jpg = 59 KB
300 dpi tiff = 252 KB
600 dpi jpg = 241 KB
600 dpi tiff = 1.07 MB

There is virtually no visual difference in the resolution of any of our pictures. The print size of the 600 dpi is more than double that of the 300 dpi scans, but the smaller files enlarged easily and there is no noticeable difference in resolution when they are printed. Does this mean that we'll be happy with the outcome of pictures scanned at 300 dpi?

Please share any information you have on the best method for preserving small photographs. Inquiring minds want to know!